How to Test your VPN For IP, DNS & WebRTC Leaks

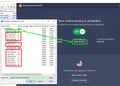
There are hundreds of VPNs in the market today, and choosing a reliable one is not easy. This is especially because some VPNs tend to focus more on functionalities such as speed and forget to seal all their security loopholes. So, is your VPN really offering the level of privacy and security that it promises?
Instead of relying on what the VPN’s marketing team tells you, you can test the VPN security and privacy levels in just a few steps. This will let you know if your VPN leaks your IP address, DNS, or WebRTC information. In this guide, we’ll look at the various types of leaks, how you can test them, and what you can do if you find any of them leaking.
This guide also explores:
- Why the various leaks happen
- How to choose a secure VPN
- The best VPNs for security
IP Address Leaks
Your IP address is your online identifier, and it carries lots of information about you, such as your city, area code, ISP, and country. It's your IP address used by search engines and websites to know the type of content to show you or even whether to restrict access to certain content.
Apart from that, it can also be used to trace your actual identity through your ISP as they know all users connected to their network.
How to test for IP address leaks
To know if your IP address is leaking, you can follow the procedure below.
- Ensure that your VPN is not connected, then check out your actual IP address. Some VPNs will show you the IP address, but if yours doesn’t, the easiest way to check it is by typing “My IP Address” on Google.
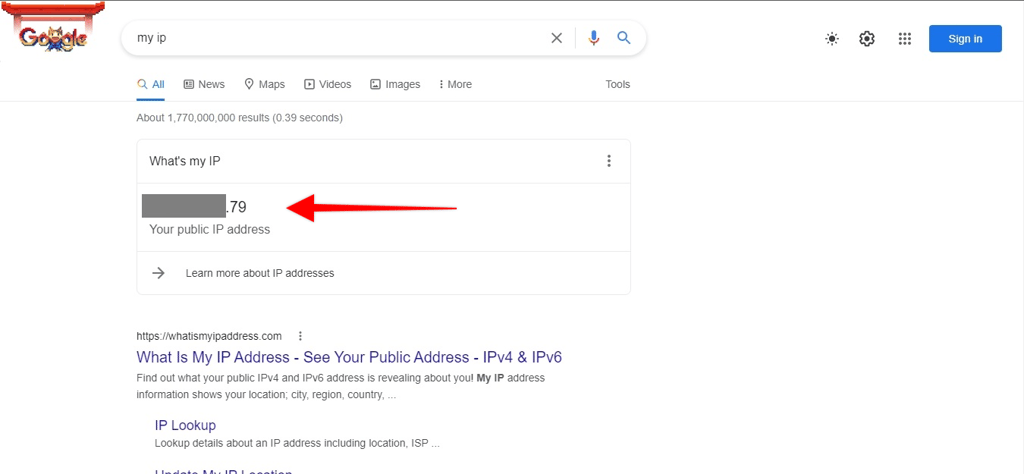
Note the IP address as you’ll need to refer to it later.
- Connect your VPN to a server in a different country and wait for the connection notification.
- Now, you’ll need to do a more extensive test than just looking up your IP address on Google. Head to ipleak.net and check the IP address displayed.
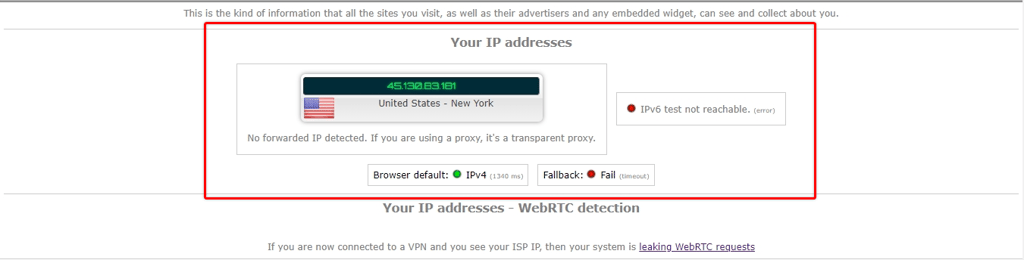
If you see your actual IP address anywhere, then your IP address is leaking.
What can you do if your IP address is leaking?
If your IP address is leaking, this is most likely because your ISP uses IPV6 addresses alongside IPv4 addresses. You can start by checking if your VPN has an IPv6 leak protection feature and if it's not enabled, turn it on.
If this doesn’t work or your VPN doesn’t have the feature, you have an option to disable IPv6. However, this is highly discouraged as it disables many other functionalities, especially on Windows PCs. The best way to sort this issue is by choosing a VPN that completely hides your IP address. ExpressVPN and NordVPN are two of the most reliable options.
DNS Leaks
DNS stands for Domain Name System, and it is a server system used to translate domains to actual IP addresses for the computer to understand the website you are looking for. Normally, your ISP handles these requests, and they can see and log the websites you visit and even create a profile of you.
A secure VPN helps avoid this kind of spying by routing your DNS requests to a private server that doesn’t log your activities. Those that don’t run a private DNS use third-party DNS servers such as Google, which offer a lower level of privacy but are still much better than the ISP DNS.
How to Test your VPN for DNS Leaks
The process of checking whether your VPN is leaking requests back to your ISP is similar to checking for IP leaks. Here’s the procedure.
- Start by checking your current DNS servers when the VPN is not connected. To do that, head back to ipleak.net and check the DNS section. Note the IP addresses.
-
Now, connect your VPN to several random servers in a different country and do a few DNS tests for each.
Other websites you can use are dnsleaktest.com and ipleak.org. Since checking for DNS leaks is not as direct as checking for IP leaks, multiple tests will give you a more reliable result.

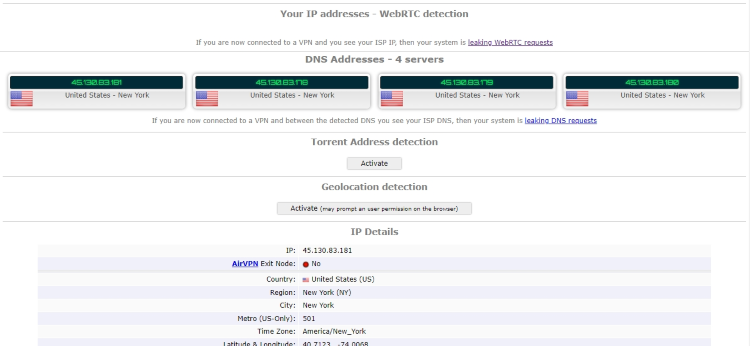
If your DNS tests show your original DNS IP addresses, then your DNS requests are leaking back to your ISP.
What can you do if your DNS Requests are leaking?
If your VPN is leaking your DNS addresses, you can start by checking if it has a DNS leak protection feature and if it's enabled. If the VPN doesn't run a Private DNS service and relies on third-party DNS servers, you can also manually switch your DNS servers. This can be done on a specific device or even at the router level. The latter will change the DNS servers of all connected devices (after restarting the router).
An even better option is to use a VPN that provides a DNS leak protection feature, whether automatically or manually. Such a feature forces all interfaces on the device to use the VPN’s DNS, preventing any chances of a DNS leak.
WebRTC Leaks
WebRTC stands for Web Real-Time Communication, and it is a technology that enables browsers to facilitate video chats and peer-to-peer functionality. To do this, it has to determine a device's IP address, even if it’s behind a NAT. Unfortunately, malicious people can exploit this with a few JavaScript codes and a STUN server to determine your actual IP address, even when you are using a VPN. The functionality is found on most modern browsers, including Chrome, Firefox, and Edge.
How to test for WebRTC Leaks
You can test WebRTC leaks easily by connecting your VPN to a server and then heading to browserleaks.com/webrtc. The website will show the public IP address that their WebRTC STUN server has detected.

For an even extended test, give the website permission for audio and video, then refresh. This will allow it to test the IP address broadcasted by these interfaces alongside the public IP address.
What can you do if your WebRTC IP address is leaking?
One way you can prevent WebRTC leaks is by disabling the technology on your browser. However, this is not recommended as it will prevent you from using all WebRTC-related functions.
The best way to prevent WebRTC leaks is by using a VPN whose firewall rules enforce that the device can only send traffic over the encrypted VPN tunnel. Surfshark VPN is one such VPN.
Other Important Security Considerations
IP, DNS, and WebRTC leaks aren’t the only concerns that you should have about your VPN. To ensure that you are fully protected, here are some other factors that you should consider:
A Kill Switch
A kill switch is a useful feature that helps avoid accidental exposures. It does this by discontinuing all internet connections whenever the VPN drops, either accidentally or even on purpose.
Such functionality is crucial, especially if you use the VPN for purposes such as torrenting. If your VPN loses its connection for whatever reason, your IP address will be exposed, and your ISP will also be able to tell what you were accessing.
During your VPN vetting process, also ensure that the kill switch that works properly as some don’t.
Private DNS
A VPN will change the DNS service you are using, but most VPNs only change it to a third-party service like Google's. These third-party services still log your DNS requests, so you'll only be transferring your data from your ISP to them.
If you’d like to ensure maximum privacy, choose a VPN that runs its own DNS servers. These DNS services are usually private, and they do not log any requests. ExpressVPN, for example, runs a private, encrypted DNS on every VPN server. The extra encryption prevents DNS hijacking, so your DNS queries won’t be observed or altered.
Privacy is not for the passive.
- Jeffrey Rosen
Wrap up
Just like any other software, VPNs can be unreliable. However, security is not one of the things that you want to gamble on, so it’s important to ensure that you are not exposed when you think you are safe. Always ensure that you choose your VPN service carefully, and even then, carry out several tests to ascertain its level of privacy and security.